What I’ve Been Up To

I know I’ve been gone a long time, but I’m back now. After a long and unproductive winter (during which I mostly hibernated), I’ve had a somewhat creative spring and summer so far. I thought I’d share some projects that I’ve finished over the past few months.

I made a Sew Together bag for my pen pal Jennifer’s birthday. It was easier to sew than I thought it would be. It just took a long time because there were a lot of steps. The Sew-A-Long by Quilt Barn was a huge help in putting the bag together. Every step was covered and had photos.

PinkArrows_0015APinkArrows_0021AFor my husband’s nephew’s high school graduation gift, I made an arrows quilt. He was really tough picking colors for because his mom said she wasn’t sure what colors he liked but he likes to wear blue a lot and sometimes orange and gray. So I went with those three colors and hoped for the best. I decided to go with solids because I couldn’t find any “boy” prints that I thought he’d like.

For the pattern, I chose one called Flyin’ South by Canoe Ridge Creations. It’s supposed to be a mini quilt but I thought it would look nice as a twin-size quilt. After making it though, I wouldn’t make it as a full-size quilt again. It took me 59 hours to make and took forever to cut out all the pieces and sew the blocks together. I thought I’d never get it finished. I love how it turned out, though.

JordanQuilt_0002AWJordanQuilt_0001AWMy sister Grace had a baby girl last month, so I made her a Fancy Fox quilt which I’ve been wanting to make for a long time. Great excuse, huh? I love how it turned out. Grace likes blues and grays and didn’t want too much pink, so I didn’t put pink in it at all. I though it would look good with solids with all those different colors. I quilted it with a wood grain pattern. I was really nervous about it because I didn’t want to ruin the quilt, but it ended up being easier than I thought. I really like how it looks. I think it’s my favorite quilting pattern right now.

FancyFox_0004AWFancyFox_0017W
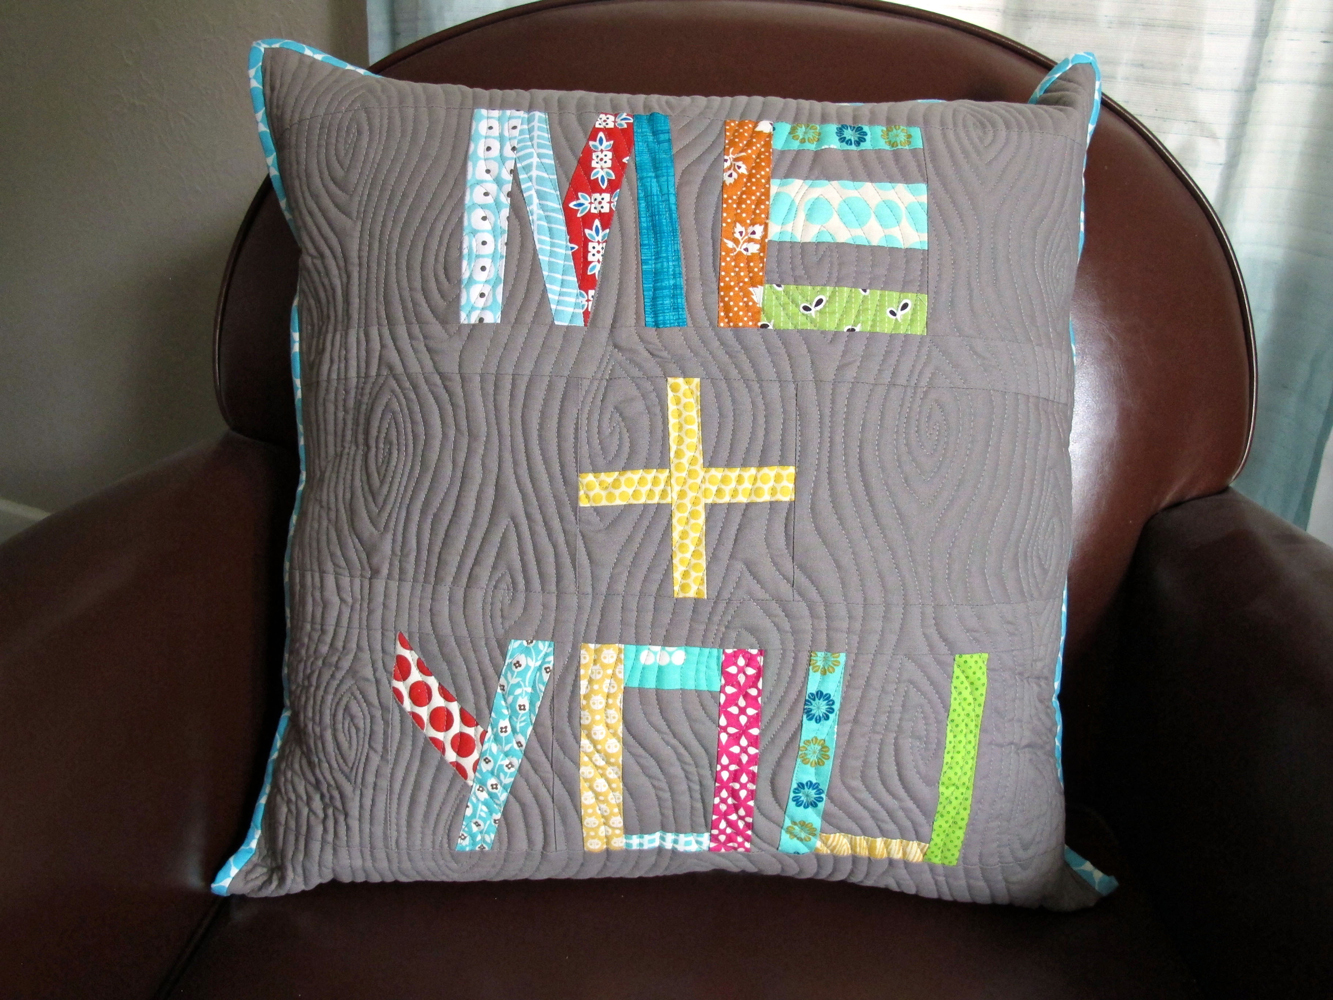
A couple years ago I was obsessed with quilting with words. One project I wanted to make was a pillow that said Me + You. I just never got around to it. I finally finished it this month. I’m really happy with the way it turned out. And it seems like perfect timing because I was able to quilt it with a wood grain pattern. If I hadn’t quilted the Fancy Fox quilt with the wood grain, I probably wouldn’t ever have attempted that pattern. That pattern fits perfectly with the whole carved initials and tree theme. In the photo the two strips of gray fabric between the ME and YOU look lighter than the rest of the gray fabric but it’s all from the same bolt. Weird, huh?

Me+you_0002AWAnd finally, I finished a ripple afghan that I started in 2010. It’s kind of a funny story because I bought a bunch of skeins of yarn back in 2010 in blue, gray, green and lavender, intending to do the whole afghan in those colors. I started the first 9 rows in those colors. Then I stopped for some reason. When I found the afghan this year, I discovered that the brand of yarn and colors I bought five years ago was discontinued. I didn’t want to start over and I didn’t want to unravel all nine rows that I already crocheted. So I just left them and tried to find colors that would go with the colors that I already bought before. I found a couple of colors that were similar to the ones I already had, so that helped. I think it turned out ok and I like how the colors look together.

RippleAfghan_0002W

Modern Cross Pillow

Back in April I was contacted by the social media and marketing director of Camelot Fabrics. She was interested in having me create a quilted project for their web site. I was very flattered. They have some really cool fabrics. I was able to choose from all of them and pick the ones I liked the best to use in whatever I designed for them. Having never designed a quilt before, I decided to start small and created a pillow design.

I’ve always liked half-square triangles and crosses, so I combined them and came up with the design below. My friend Emma said she liked the design but she probably wouldn’t make the pillow herself because of all the triangles. I do see what she means. It’s also a pretty large pillow at 20″ and could seem daunting to some people. When I submitted the design to Camelot Fabrics, they asked me if I could redesign it with just one star so that it would be a little simpler.

modern cross pillow

modern cross pillow1So after the redesign, here’s what the new pillow design looks like. It’s a 16″ pillow. I think I do like it better with just one star. It looks a lot more doable. So doable in fact, that I had to try it out for myself. I used this pattern for the Modern Quilt Guild’s Michael Miller fabric challenge that ended last month.

Here’s my submission for the challenge. I also entered it in the Iowa State Fair and it won second place. All’s well that ends well.

moderncrossIf you want to try the pattern out yourself, you can download it for free here.


Starting the Year Off with a Finish

I’ve been in hibernation mode since Thanksgiving, so I’m happy to report that I actually started this month off by finishing a quilt. It’s my Bloomsbury Gardens quilt that I started in 2012. I really love all the fabrics together. They’re very striking and they complement each other well. I’ve always wanted a Liberty of London quilt and now I have one!

Bloomsbury quilt_0003AWBloomsbury-quilt_0019AWI’m not happy that you can’t see the quilting very well on the front. I really wanted to use cream thread on the front and blue thread on the back, but I had tension problems with the cream thread showing up on the back. So I used blue thread on both sides. So it’s hard to see the quilting on the front. But you can see it really well on the back and it looks pretty good. The quilting design I used was Ohfransson’s Dogwood pattern. I really love it so much. I just wish you could see it better on the front.

Bloomsbury-quilt_0017AWLast week at my quilting group’s monthly meeting, we brought a list of all of our UFOs (unfinished objects). My list was the smallest with eight projects unfinished, but I do want to make a dent in it and finish at least a third of those projects by the end of this year. Of course, by the time I do, inevitably, more projects will be added to that list (it’s funny how that works). We agreed to revisit our lists in December and see if any of us have made progress on our UFOs. I hope to be one of them.

But I also decided that there is one UFO I won’t be finishing. It is a group project my quilting group and I made together when I first joined the group. While I enjoyed working on the medallion quilt when we were making it, it has prairie points that I’m not really crazy about. And my tastes have changed since then. So I don’t really want to spend the time, energy and money to have the quilt top quilted and bound. Making that decision feels good. And it feels right to me.

I think that just because you have a UFO doesn’t mean you have to finish it. You may not be the same person you were when you first started it. Things change and your tastes change. It’s ok to admit that you don’t love something you started awhile ago. Give it to someone else who might like it more. Or donate it to a charity. In my case, I’ll keep the medallion quilt top. It means a lot to me because my friends and I made it together. I’m just not interested in finishing it anymore.

I have decided not to make any resolutions for this year. They always seem to fall by the wayside, anyway. I’ve decided what I want is for worry, fear and unhappiness not to have a place in my life. I want to be happy and have more fun this year. I’ve also decided that life is too short to spend a single moment doing something I don’t want to do. So I want to make every minute count. 2013 was kind of a bust for me, so I’m hoping 2014 will be much better. I hope this year is a good year for you, too. Happy 2014!

Teresa’s House Quilt

Back in December, my quilting group Seams So Easy lost a member. Our beloved Teresa got a great job offer in Orlando that was too good to pass up. So, of course, we wished her well and hoped she would find much happiness there. But we felt a deep sense of loss because she was the heart and soul of our group and she would be deeply missed. She is one really nice lady and I’ll never forget her.

So once Teresa told us she was leaving for the sunny climes of Florida, the rest of us secretly planned a quilt for her. Yeah, we’re sneaky like that. That’s the Seams So Easy way. I looked all over the Internet for quilts that the five of us could finish quickly and easily. We wanted to finish the quilt pretty quickly so she could have something in her new home to welcome her and remind her of her friends back in her old home state. I sent links to everyone of photos of quilts that reminded me of Teresa and everyone voted on them. There wasn’t a clear front runner. But then I saw this houses quilt by Oh, Fransson! and thought it was perfect. And so did everyone else. So that was the quilt we went with.

We decided how many blocks we wanted in the quilt and what color each of us wanted to use in our blocks. We also decided to embroider a message or a quilt block and our name in the center of each block. I drafted a rough design of the quilt in Adobe Illustrator so everyone could get an idea of what it was going to look like before we started it.

IMG_1353_0005WThe centers of the blocks that we embroidered

IMG_1354_0006WWe wanted to spend some time together working on the blocks as a group. So, Dawn, who is a soldier at Camp Dodge, was able to let us in there for a day. We got together on New Year’s Day and started sewing the quilt blocks. It was a perfect space for sewing. We sewed the whole quilt top together! (You can click on the photos to see them larger.)

IMG_1356_0008AW

Tricia, Emma and Lisa busily piecing their house blocks

housesWWe were hoping to finish the quilt in a month or two, but as the song by John Lennon goes, “Life is what happens to you while you’re busy making other plans.” It was quilted in early March. Emma quilted it in a beautiful wood grain pattern. It turned out awesome. She really did a great job on it.

Teresa'sQUILTWWe finally got the quilt mailed to Teresa in late March, I think. We heard from her last month and she said loved it. We loved it so much, too, that we decided to make it again; for ourselves this time, as a group project. We’re each going to make one and make blocks for each other to use in each of our quilts.

I love group projects like this. They’re so rewarding and they go fast with so many people working on them. Have you ever been part of a group project like this? If so, what did you make?

A Pen Pal Swap

Back in February, my pen pal Jennifer and I decided to do a doll quilt swap. I was excited about it, but also kind of nervous because she’s a fabulous quilter and I was afraid that her skill level was a little more advanced than mine.

I always wanted to join the Flickr Doll Quilt Swap but was always too busy. Plus, the last couple Flickr swaps I did, I felt like I put in a lot of effort but didn’t get much back for all the time I spent on my swap project. So I kind of got burned out on doing swaps for a while.

I was at a loss for what to make for Jennifer until I looked through her Flickr favorites and saw a pillow made from the paper-pieced popsicle pattern by Ayumi Takahashi of Pink Penguin. So that’s what I chose for her doll quilt. I thought it was perfect. It’s been on my to do list for a while so I’m really glad I got to make it. It was fun to make and easier than I thought it would be.

041313_0029AWThe doll quilt I made for Jennifer

I had intended to include a few extra goodies, as is customary with swaps, but I was sidelined with migraines the week that our swap was due. So I just mailed the doll quilt by itself. However, if I had known about all the goodies that Jennifer was sending me, I definitely would have made an extra effort to send her some extra things in her package.

042813_0012AWAll of the goodies that Jennifer sent me with my doll quilt

When I received my package from her, I was overwhelmed, to say the least. I opened the box and kept pulling out object after object. I gasped as I pulled out each item. You can ask my husband if you don’t believe me. And then I finally saw the doll quilt which was at the bottom of the box. I was so surprised. I couldn’t believe all the work she put into it. And her embroidery is perfect! It’s funny because the soda pop pattern she used has also been on my to-do list for a long time. I guess great minds think alike. Speaking of great minds, I think it’s funny that we both chose the exact same backing fabric for our doll quilts.

042813_0002AW042813_0004AW042813_0009AW

Jennifer even hand-embroidered the label on the back and sewed on a sleeve to hang the quilt. I wish I would have thought of that. That was so thoughtful. This was the best swap I’ve ever been a part of and totally makes up for all the not-so-good swaps I’ve been in. Jennifer, you’re the best swap partner ever! I’m definitely going to be sending some handmade goodies your way soon.

I Met Vanessa Christenson!

On Friday night, the awesome Vanessa Christenson of V and Co. came to speak to our Modern Quilt Guild. She spoke about using traditional blocks in modern quilting and did a fabulous job. She was so funny and down-to-earth. I really loved everything she had to say about modern quilting and quilting in general.

041913_0034AWVanessa said when people ask her if she’s a modern quilter or traditional quilter, she tells them that she’s just a quilter. I like that answer. She really wants all quilters to feel like we belong to a great sisterhood of quilters that have passed on this wonderful art and tradition that continues to live and grow and get passed on to future generations. She said she believes it will continue to change, grow, live on and never die. Each generation will add its own mark or stamp to quilting just like ours has. And all generations can learn something from each other.

041913_0020AWA Dresden Plate block Vanessa made with her new fabric

We got to see a lot of Vanessa’s quilts in person that she has posted on her blog. It was so cool to be able to see them up close. Vanessa also gave us a Power Point presentation and showed how simple it is to take a traditional block and make it modern just by changing up the placement, the color, the scale of fabrics or the angle.

041913_0004AWAn ombre quilt Vanessa quilted with straight lines

I loved Vanessa’s super friendly and charismatic personality. Instead of shaking my hand when I met her, she reached over and gave me a hug. She’s one of those people you just instantly like. I’ve been following her blog for a couple of years and always imagined that her personality was just like this. It’s always such a pleasure when you get to meet a celebrity and the idea of what you think they’re like matches up to their true nature.

What I also really liked about Vanessa is that she can be honest about what she’s not good at. She said she’s not great at free motion quilting and she’d rather pay someone else a million dollars to do that for her. I think that’s something that a lot of us quilters can identify with. Vanessa quilts all of her own stuff with straight lines (because she likes that look) and pays someone else to do the fancy stuff. That’s nice to hear that even the experts aren’t perfect at everything.

If you asked me what kind of quilter I am, I would say I’m just a quilter, too. I love traditional quilts and modern quilts. But there are some aspects of both that I don’t like. So, yeah, I’m just a quilter.

Solids Pyramid Baby Quilt

RidgeQuilt_0002AW

I wanted to share my latest quilt with you. I’m really excited about it and so pleased with how it turned out. It’s a pyramids baby quilt that I made for my husband’s great nephew Ridge, who was born in February. This kind of quilt is also known as an equilateral triangle quilt. It’s a simple design but there’s something so pleasing about it.

This quilt has been on my to-do list for years. I don’t know why I waited so long to try this wonderful pattern. I thought sewing the triangles together would be hard and making sure the points would match up would be tricky, but it really wasn’t difficult at all. In fact, it was one of the easiest quilts I’ve ever made. It went together quickly because I cut the triangles large. I cut 7.5″ triangles so they finished at 7″. This actually makes a nice throw-size quilt, too. It ended up being 44.5 x 56″.

RidgeQuilt_0006AW

I got the inspiration for the colors after seeing this quilt. It reminds me of old Amish quilts, which I really love. When I showed my quilt to a coworker, she was surprised because she said it didn’t look like any of the other modern stuff I normally make. Lately I’ve been drawn toward using solids. I’d like to use them more.

RidgeQuilt_0013AW

One thing I did differently with this quilt is that I machine-sewed the binding on. I normally sew the binding on the traditional way by sewing it on the front of the quilt by machine first, then folding it over the edge and then hand sew it to the back of the quilt. But since I was short on time and this was going to be a baby quilt that I figured was going to be washed repeatedly, I decided machine sewing the binding on all the way would be more durable over time.

RidgeQuilt_0010AW

I use this method of binding for all my potholders because it’s more durable for repeated washings, but I’ve never done it on a quilt because I think hand sewing looks more professional. For a baby quilt, I think it’s passable. A baby isn’t going to notice. I would never use this method for a quilt I was going to enter into a show, though.

If you’re curious about how I did it, I’ll explain. I machine-sewed the binding strip onto the quilt front as usual, flipped the binding over to the back, pressed it really well with an iron and used these awesome clips by Clover to hold the binding in place. Then I stitched in the ditch from the front of the quilt along the binding, catching the back of the binding as I sewed. It does take some practice to make it look nice.

I’m so in love with this quilt that I’m already planning my next pyramids quilt. I think I’ll make it a little larger, though, so it would make a nice twin-size quilt or a large throw for the couch. I can see many more of these in my future. Try one. I think you’ll like it.

Zigzag Quilt Once More

AngieQuilt_0001AW

No, you’re not experiencing déjà vu. This quilt may look quite familiar, but it’s actually slightly different from this one that I made for my nephew Gavin when he was born last summer. When my sister Angie saw it, she said she loved it so much that it almost made her wish she were having a baby so that she could have one just like it. She loved the colors, the fabrics and everything about it.

Her not-so-subtle hint wasn’t lost on me. So I told Angie I’d make her a quilt just like Gavin’s. I was lucky enough to find all but one of the same fabrics that I used for the first quilt. I did change the order of some of the stripes, though, so it wouldn’t be exactly the same as the first quilt. I don’t want any two quilts I make to ever be exactly the same. That’s just a rule of mine when I’m making quilts.

AngieQuilt_0007AW

I used this great tutorial by Crazy Mom Quilts and I still intend to make one of these zigzag quilts for myself one of these days. It’s a great throw size for the couch. So many quilts and so little time!

This quilt is on its way to North Carolina. I hope you like it, Angie!

Striped Heart Block Tutorial

In honor of Valentine’s Day, I wanted to share this heart block tutorial with you. I was inspired by Jacquie’s heart block at Tallgrass Prairie Studio. When I saw hers, I knew I had to make it. But I wanted it smaller, so I adapted the pattern slightly to make it a potholder size. It finishes at 7 1/2″ (8″ with the binding on it) and it’s the perfect size for a potholder.

stripe-heart_0001WA sample potholder I’ve made using this tutorial

stripeheartblock_0020AWHere’s the finished block

Materials needed:
• 5 – 1 1/4 x 18″ strips of fabric (from five fabrics)
• 4 – 2 3/8″ squares of background fabric
• 2 – 4 1/4″ squares of background fabric

(Note: This tutorial is for personal use only. Please do not use it to make anything to sell. Thank you.)

stripeheartblock_0003AW

Gather your fabrics (small-scale prints works best) and cut one 1 1/4 x 18″ strip from each fabric and sew them together. Make sure to use scant or exact 1/4″ seam allowance. Because the strips are quite narrow, it is very important that you are accurate in measuring, cutting and sewing your strips or else each quarter of the block will not end up the correct size. And that will throw off the final size of your block.

stripeheartblock_0007AW

The final width of the sewn strips should be 4 1/4″. Press seam allowances in the same direction.

stripeheartblock_0008AW

Cut the strips into four 4 1/4″ squares. Place them in a four-square pattern and alternate the direction of the strips as shown above.

stripeheartblock_0010BWDraw a diagonal line across each of the background squares, from corner to corner.  Place the larger background squares on top of the right side of the two bottom strip set squares and sew across the marked diagonal line. Cut off the excess fabric, leaving a 1/4″ seam allowance. Press down the background triangle. Place the smaller background squares on top of the two top edges of the two top strip set squares and sew across the marked diagonal lines. Cut off the excess fabric, leaving a 1/4″ seam allowance. Press down the background triangles.

stripeheartblock_0015BWstripeheartblock_0019AWSew the two top halves together and repeat with the two bottom halves. Press the seam allowances in the opposite direction. Sew the top and bottom halves together.

stripeheartblock_0020AW

That’s it! You’re done! I hope you enjoyed this tutorial. It’s my very first one, so if you have any questions about anything, please let me know in the comments. I’d love to know what you think about it.

MQG Sewing Day

sewingday_0002WOver the weekend, the Des Moines MQG had a sewing day in Ankeny. So I spent six hours sewing with sixteen or so other people. I didn’t get as much accomplished as I had hoped, but I did get a quilt basted and made progress on a zigzag quilt for my sister.

If you ever get a chance to go to a guild sewing day, I really encourage you to go. I got the chance to talk with guild members far more than I would at a guild meeting. And I was also able to walk around and see what everyone was working on. It was fun seeing all the different quilts and projects in different stages of progress. It even gave me some ideas.

sewingday_0005WJill’s cool paper pieced sewing machine

sewingday_0009WThe front and back of Eva Marie’s Heads in a Jar qullt

sewingday_0008Wsewingday_0006WMelissa’s Low Volume quilt

sewingday_0010WLeila’s Skill Builder Sampler quilt

sewingday_0012WEmily’s feathers tote bag in progress

I wish I could have spent more time sewing with my friends, but I’m grateful for the time I got to spend with them. Some lucky people got to spend the whole day there. I think that any day spent sewing is a day well spent. I love quilting. It’s such a fun hobby and quilters make the best of friends.